嗨,你好呀,我是猿java
OAuth2是现代应用开发中几乎无处不在的认证与授权协议,什么是OAuth2?它是如何工作的?OAuth2有哪些典型模式?这篇文章,我们来聊一聊。
1. 什么是 OAuth2?
简单来说,OAuth2是一种授权框架,用于让应用程序在不暴露用户密码的情况下,获得访问用户受保护资源的权限。它广泛应用于第三方登录、API 授权等场景。
2. OAuth2 的核心概念
在深入讨论典型模式之前,我们先来简单了解一下OAuth2的几个核心角色:
- 资源拥有者(Resource Owner):通常是终端用户。
- 客户端(Client):希望访问资源的应用程序(比如你的Java应用)。
- 资源服务器(Resource Server):存储用户资源的服务器。
- 授权服务器(Authorization Server):负责认证和授权的服务器。
理解了这些基本概念,咱们就能更好地理解各种OAuth2的授权模式了。
3. OAuth2 的典型授权模式
OAuth2 定义了四种主要的授权模式,每种模式适用于不同的应用场景。让我们逐一来看:
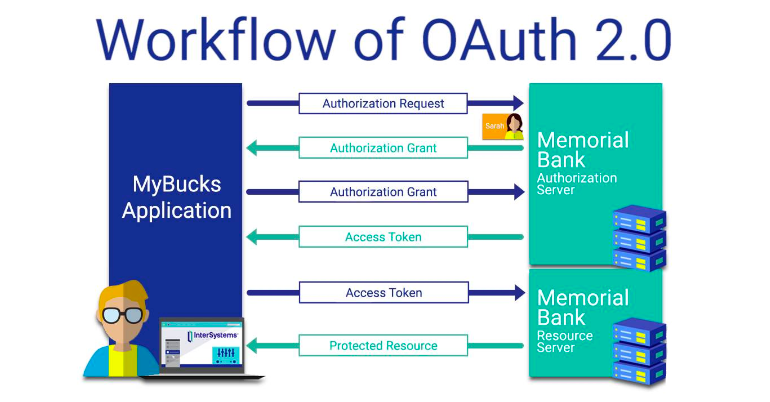
3.1 授权码模式
授权码模式(Authorization Code Grant)适用于服务器端应用,尤其是需要访问用户资源的Web应用。
流程简述:
- 用户访问客户端(你的Java应用)并请求访问受保护资源。
- 客户端将用户重定向到授权服务器,用户在授权服务器登录并授权。
- 授权服务器将用户重定向回客户端,并附带一个授权码。
- 客户端使用这个授权码向授权服务器请求访问令牌。
- 授权服务器返回访问令牌,客户端使用该令牌访问资源服务器上的资源。
示例演示:
假设你有一个Java Spring Boot应用,需要访问用户的GitHub资源。流程如下:
1
2
3
4
5
6
7
8
9
10
11
12
13
14
15
16
17
18
| @Configuration
@EnableOAuth2Client
public class OAuth2ClientConfig {
@Bean
public OAuth2RestTemplate githubRestTemplate(OAuth2ClientContext oauth2ClientContext) {
return new OAuth2RestTemplate(github(), oauth2ClientContext);
}
private OAuth2ProtectedResourceDetails github() {
AuthorizationCodeResourceDetails details = new AuthorizationCodeResourceDetails();
details.setClientId("your-client-id");
details.setClientSecret("your-client-secret");
details.setAccessTokenUri("https://github.com/login/oauth/access_token");
details.setUserAuthorizationUri("https://github.com/login/oauth/authorize");
details.setScope(Arrays.asList("repo", "read:user"));
return details;
}
}
|
在这个配置中,我们定义了如何与GitHub的OAuth2服务交互,获取访问令牌并访问资源。
3.2 隐式模式
隐式模式(Implicit Grant)适用于单页面应用(SPA)或移动应用,不适合存储客户端密钥。
特点:
- 直接在前端获取访问令牌,省去了授权码的步骤。
- 安全性较低,不推荐用于高安全需求的场景。
示例演示:
前端JavaScript代码片段:
1
2
3
4
5
6
7
8
9
10
| const clientId = 'client-id';
const redirectUri = 'https://yuanjava.com/callback';
const authUrl = `https://authorization-server.com/auth?response_type=token&client_id=${clientId}&redirect_uri=${redirectUri}&scope=read`;
window.location.href = authUrl;
const hash = window.location.hash.substring(1);
const params = new URLSearchParams(hash);
const accessToken = params.get('access_token');
|
这种方式适用于无需在后端存储敏感信息的应用,但要注意访问令牌可能会暴露在前端。
3.3 资源所有者密码凭证模式
资源所有者密码凭证模式(Resource Owner Password Credentials Grant)适用于高度信任的应用,比如官方的移动应用。
特点:
- 用户直接提供用户名和密码给客户端。
- 客户端使用这些凭据向授权服务器请求访问令牌。
注意:这种模式下,客户端需要处理用户的敏感信息,风险较高。
示例演示:
1
2
3
4
5
6
7
8
9
10
11
12
| public OAuth2AccessToken getAccessToken(String username, String password) {
ResourceOwnerPasswordResourceDetails resourceDetails = new ResourceOwnerPasswordResourceDetails();
resourceDetails.setUsername(username);
resourceDetails.setPassword(password);
resourceDetails.setAccessTokenUri("https://authorization-server.com/token");
resourceDetails.setClientId("your-client-id");
resourceDetails.setClientSecret("your-client-secret");
resourceDetails.setScope(Arrays.asList("read", "write"));
OAuth2RestTemplate restTemplate = new OAuth2RestTemplate(resourceDetails);
return restTemplate.getAccessToken();
}
|
在这个例子中,客户端直接使用用户的用户名和密码获取访问令牌。
3.4 客户端凭证模式
客户端凭证模式(Client Credentials Grant)适用于应用间的通信,或后台服务。
特点:
- 客户端直接使用自身的凭证(无需用户参与)获取访问令牌。
- 适合访问属于客户端自身的资源。
示例演示:
1
2
3
4
5
6
7
8
9
10
| public OAuth2AccessToken getClientCredentialsToken() {
ClientCredentialsResourceDetails resourceDetails = new ClientCredentialsResourceDetails();
resourceDetails.setAccessTokenUri("https://authorization-server.com/token");
resourceDetails.setClientId("your-client-id");
resourceDetails.setClientSecret("your-client-secret");
resourceDetails.setScope(Arrays.asList("read", "write"));
OAuth2RestTemplate restTemplate = new OAuth2RestTemplate(resourceDetails);
return restTemplate.getAccessToken();
}
|
这种模式下,客户端无需用户授权,直接获取访问令牌进行资源访问。
4. OAuth2 的原理
了解了各种授权模式后,我们再来看看OAuth2背后的原理,帮助你更好地理解和应用它。
- 授权码交换: 在授权码模式中,授权码是一个中间步骤,它增加了安全性。因为访问令牌不直接暴露给用户浏览器,防止恶意攻击者截获。
- 范围(Scope)控制:OAuth2允许客户端请求特定的权限范围(Scope)。比如,你的应用只需要读取用户的公开信息,就不需要请求写入权限。这样可以减少潜在的风险。
- 刷新令牌(Refresh Token): 访问令牌通常有有效期,当过期时,客户端可以使用刷新令牌获取新的访问令牌,而无需用户重新授权。这提升了用户体验和安全性。
5. 实战演示
为了更好地理解OAuth2,让我们通过一个实际的例子,使用 Spring Security来实现OAuth2的授权码模式。
5.1 项目配置
首先,添加必要的依赖:
1
2
3
4
| <dependency>
<groupId>org.springframework.boot</groupId>
<artifactId>spring-boot-starter-oauth2-client</artifactId>
</dependency>
|
5.2 配置 OAuth2 客户端
在 application.yml 中配置OAuth2客户端信息:
1
2
3
4
5
6
7
8
9
10
11
12
13
14
15
16
17
18
| spring:
security:
oauth2:
client:
registration:
github:
client-id: client-id
client-secret: client-secret
scope: read:user,repo
redirect-uri: "{baseUrl}/login/oauth2/code/{registrationId}"
authorization-grant-type: authorization_code
client-name: GitHub
provider:
github:
authorization-uri: https://github.com/login/oauth/authorize
token-uri: https://github.com/login/oauth/access_token
user-info-uri: https://api.github.com/user
user-name-attribute: id
|
5.3 创建安全配置
1
2
3
4
5
6
7
8
9
10
11
12
13
| @EnableWebSecurity
public class SecurityConfig extends WebSecurityConfigurerAdapter {
@Override
protected void configure(HttpSecurity http) throws Exception {
http
.authorizeRequests(a -> a
.antMatchers("/", "/error").permitAll()
.anyRequest().authenticated()
)
.oauth2Login();
}
}
|
5.4 创建控制器
1
2
3
4
5
6
7
8
9
10
11
12
13
14
| @Controller
public class MainController {
@GetMapping("/")
public String home() {
return "home";
}
@GetMapping("/user")
public String user(Model model, @AuthenticationPrincipal OAuth2User principal) {
model.addAttribute("user", principal);
return "user";
}
}
|
6. 总结
本文,我们深入浅出地介绍了 OAuth2的四种典型授权模式:授权码模式、隐式模式、资源所有者密码凭证模式以及客户端凭证模式。OAuth2作为现代应用中的核心认证与授权框架,允许应用在不暴露用户密码的情况下安全地访问受保护资源。
7. 交流学习
最后,把猿哥的座右铭送给你:投资自己才是最大的财富。 如果你觉得文章有帮助,请帮忙转发给更多的好友,或关注公众号:猿java,持续输出硬核文章。