// Thread 源码,通过 @PreviewFeature 注解来标注 虚拟线程为 预览功能 publicclassThreadimplementsRunnable { /** * Creates a virtual thread to execute a task and schedules it to execute. This method is equivalent to: Thread.ofVirtual().start(task); Params: task – the object to run when the thread executes Returns: a new, and started, virtual thread Throws: UnsupportedOperationException – if preview features are not enabled Since: 19 See Also: Inheritance when creating threads * @param task * @return */ @PreviewFeature(feature = PreviewFeature.Feature.VIRTUAL_THREADS) publicstatic Thread startVirtualThread(Runnable task) { Objects.requireNonNull(task); // 判断是否开启虚拟线程功能 PreviewFeatures.ensureEnabled(); varthread= ThreadBuilders.newVirtualThread(null, null, 0, task); thread.start(); return thread; }
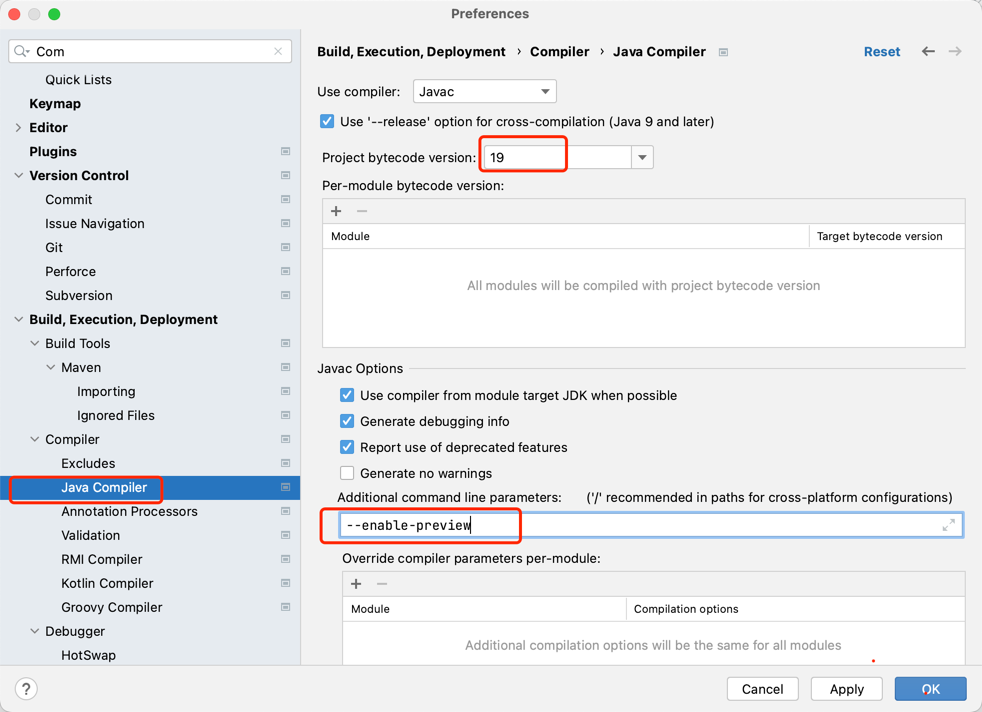
// 异常信息提醒 可以通过 --enable-preview 开启虚拟线程功能 publicstaticvoidensureEnabled() { if (!isEnabled()) { thrownewUnsupportedOperationException( "Preview Features not enabled, need to run with --enable-preview"); } } }
/** * A thread that is scheduled by the Java virtual machine rather than the operating system. */ finalclassVirtualThreadextendsBaseVirtualThread {
/** * Creates a new {@code VirtualThread} to run the given task with the given * scheduler. If the given scheduler is {@code null} and the current thread * is a platform thread then the newly created virtual thread will use the * default scheduler. If given scheduler is {@code null} and the current * thread is a virtual thread then the current thread's scheduler is used. * * @param scheduler the scheduler or null * @param name thread name * @param characteristics characteristics * @param task the task to execute */ VirtualThread(Executor scheduler, String name, int characteristics, Runnable task) { super(name, characteristics, /*bound*/false); Objects.requireNonNull(task);
// choose scheduler if not specified if (scheduler == null) { Threadparent= Thread.currentThread(); if (parent instanceof VirtualThread vparent) { scheduler = vparent.scheduler; } else { scheduler = DEFAULT_SCHEDULER; } }
publicclassThreadimplementsRunnable { /** * Creates a virtual thread to execute a task and schedules it to execute. This method is equivalent to: Thread.ofVirtual().start(task); Params: task – the object to run when the thread executes Returns: a new, and started, virtual thread Throws: UnsupportedOperationException – if preview features are not enabled Since: 19 See Also: Inheritance when creating threads * @param task * @return */ @PreviewFeature(feature = PreviewFeature.Feature.VIRTUAL_THREADS) publicstatic Thread startVirtualThread(Runnable task) { Objects.requireNonNull(task); // 判断是否开启虚拟线程功能 PreviewFeatures.ensureEnabled(); varthread= ThreadBuilders.newVirtualThread(null, null, 0, task); thread.start(); return thread; }
// 异常信息提醒 可以通过 --enable-preview 开启虚拟线程功能 publicstaticvoidensureEnabled() { if (!isEnabled()) { thrownewUnsupportedOperationException( "Preview Features not enabled, need to run with --enable-preview"); } } }
/** * Returns a builder for creating a virtual {@code Thread} or {@code ThreadFactory} * that creates virtual threads. * * @apiNote The following are examples using the builder: * {@snippet : * // Start a virtual thread to run a task. * Thread thread = Thread.ofVirtual().start(runnable); * * // A ThreadFactory that creates virtual threads * ThreadFactory factory = Thread.ofVirtual().factory(); * } * * @return A builder for creating {@code Thread} or {@code ThreadFactory} objects. * @throws UnsupportedOperationException if preview features are not enabled * @since 19 */ @PreviewFeature(feature = PreviewFeature.Feature.VIRTUAL_THREADS) publicstatic Builder.OfVirtual ofVirtual() { PreviewFeatures.ensureEnabled(); returnnewThreadBuilders.VirtualThreadBuilder(); } }
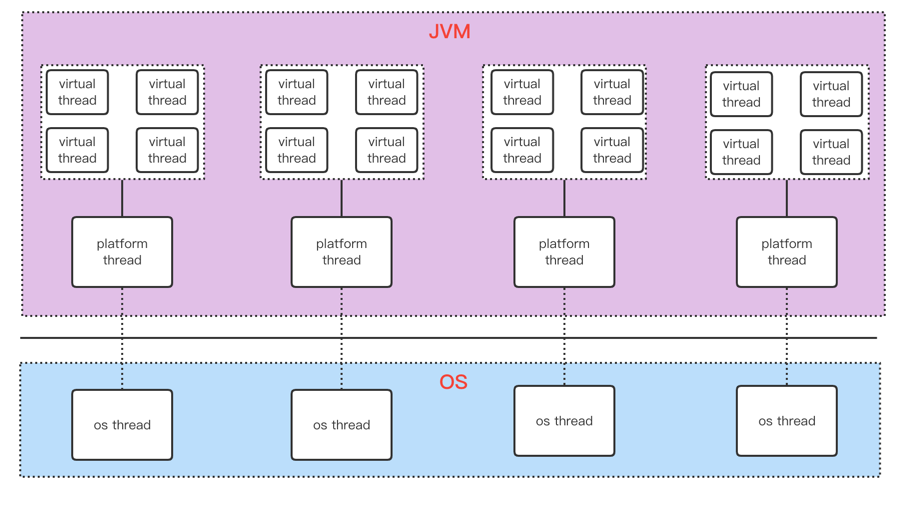
Thread.startVirtualThread()创建虚拟线程,会调用ThreadBuilders.newVirtualThread(),最终调用 new VirtualThread()构造器来创建虚拟线程。
finalclassVirtualThreadextendsBaseVirtualThread { /** * Mounts this virtual thread onto the current platform thread. On * return, the current thread is the virtual thread. */ @ChangesCurrentThread privatevoidmount() { // sets the carrier thread Threadcarrier= Thread.currentCarrierThread(); setCarrierThread(carrier);
// sync up carrier thread interrupt status if needed if (interrupted) { carrier.setInterrupt(); } elseif (carrier.isInterrupted()) { synchronized (interruptLock) { // need to recheck interrupt status if (!interrupted) { carrier.clearInterrupt(); } } }
// set Thread.currentThread() to return this virtual thread carrier.setCurrentThread(this); }
/** * Unmounts this virtual thread from the carrier. On return, the * current thread is the current platform thread. */ @ChangesCurrentThread privatevoidunmount() { // set Thread.currentThread() to return the platform thread Threadcarrier=this.carrierThread; carrier.setCurrentThread(carrier);
// break connection to carrier thread, synchronized with interrupt synchronized (interruptLock) { setCarrierThread(null); } carrier.clearInterrupt(); } }